
When a tile roof leaks, most homeowners assume a tile is broken somewhere and that’s what needs to be fixed. This is understandable — tile is the visible part of the roof, and it seems logical that water would come through a crack in the tile.
Here’s the thing: in most cases, the tile isn’t the problem.
Tile is designed to shed water, not to be the primary waterproof barrier. That job belongs to the underlayment — the membrane installed beneath the tile, between it and the wood deck. The tile protects the underlayment from UV, physical impact, and weather. The underlayment stops water from entering the structure.
When a tile roof leaks, it almost always means something has failed in the underlayment, the flashing, or one of the penetrations through the roof. The tile above the leak may look completely intact. Here’s where the real culprits are.
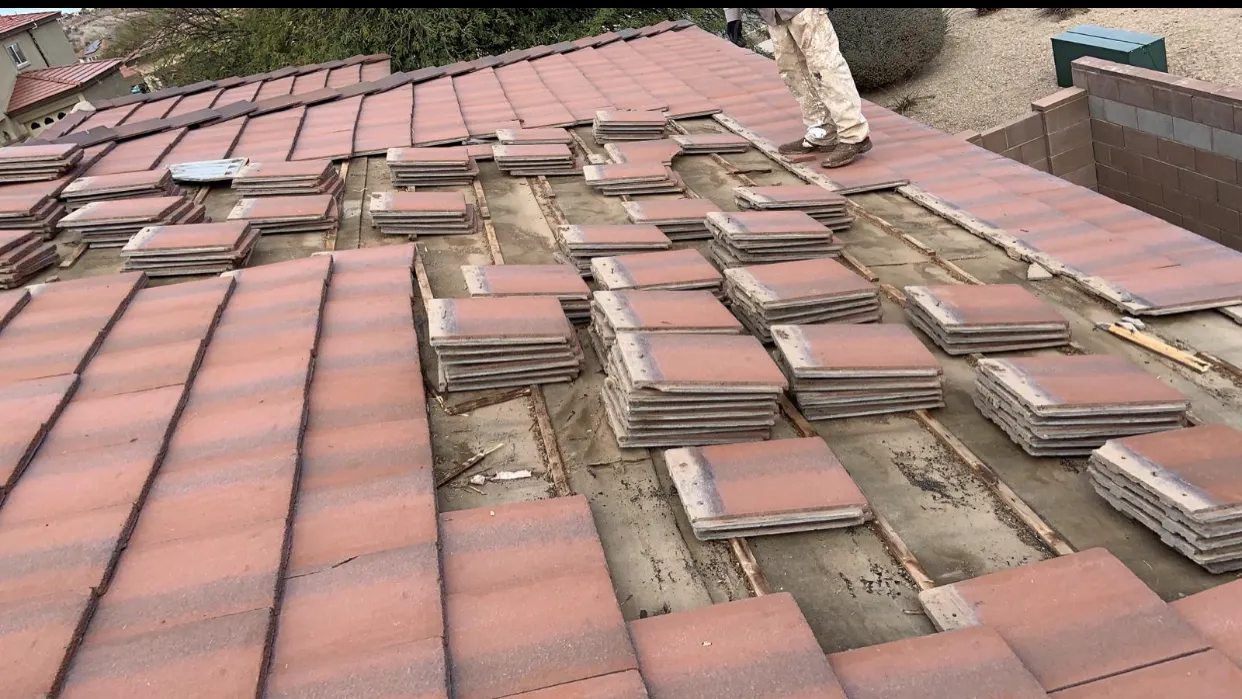
Failed Underlayment
This is the most common cause of tile roof leaks in Arizona, and it’s the one that surprises homeowners most often because there’s nothing visually wrong with the roof from the outside.
Arizona’s climate is particularly hard on underlayment. The intense UV, extreme heat, and significant temperature swings — from freezing winter nights to 110°F summer days — cause felt and synthetic underlayments to age faster than in milder climates. Felt underlayment has a real-world lifespan of 10–20 years here. Synthetic underlayment performs better but still has limits.
When underlayment reaches end of life, it becomes brittle. It cracks. In some cases, it simply disintegrates in sections. At that point, any water that gets under the tile — through cracked or missing tile, through a wind-driven rain event, or simply through the capillary action of water finding gaps — goes straight to the deck.
The telltale sign of underlayment failure is multiple leaks appearing in different areas of the roof over a short period, or widespread leaking during a heavy rain when no obvious tile damage is visible. If a roof is 20+ years old and starting to leak in multiple places, the underlayment is the first thing to suspect.
The fix for failed underlayment is a re-underlayment: tiles are removed, the old membrane is stripped, new underlayment is installed, and the tiles are reset. This is a significant job but far less expensive than replacing the tile itself.
Cracked or Deteriorated Pipe Boots
Pipe boots are the rubber or metal boots that seal around the plumbing vent pipes that come through your roof. Every home has at least one, most have several. The rubber collar that seals around the pipe is vulnerable to UV degradation — in Arizona’s sun, neoprene and EPDM rubber can crack and pull away from the pipe in as little as 5–10 years.
A failed pipe boot creates a direct opening for water to enter around the pipe. During a monsoon, water pours in. The leak usually shows up on a ceiling directly below or near the pipe, though water can travel along rafters before dripping, so the stain isn’t always directly below the boot.
Pipe boot replacement is one of the most common repairs we do and also one of the most straightforward. A new boot, properly sealed, solves the problem and should last another 10+ years. If your roof is older and you haven’t had the boots inspected, it’s worth checking — they fail quietly and the damage from a slow pipe boot leak can accumulate for months before you notice.
Flashing Failures
Flashing is the metal sheeting used to seal the joints and transitions on a roof — where the roof meets a wall or chimney, around skylight curbs, at the edges of HVAC equipment curbs, and along the valleys where two roof planes meet. Flashing is usually aluminum or galvanized steel, bedded in roofing cement or polyurethane sealant.
The sealant is the weak point. In Tucson’s heat, sealant dries out, shrinks, and cracks. The bond between the flashing and the adjacent surface breaks, leaving a gap. Water runs into the gap.
Wall flashings — where a roof meets a stucco wall — are common culprits. The step flashing or counter flashing that tucks into the wall needs to maintain a watertight seal as both the masonry and the metal expand and contract with temperature. Over time that movement breaks the seal.
Chimney flashings are similar — the base flashing, counter flashing, and sealant at the chimney base are a high-maintenance area on any roof. If you have a chimney and you’re getting leaks, that’s the first place to look.
Skylight flashings are particularly prone to failure because a skylight curb creates multiple transition points and penetrations in close proximity. Leaks around skylights are extremely common and almost always a flashing or sealant issue rather than a problem with the skylight glass itself.
The repair for flashing leaks ranges from simply resealing with a quality sealant (Geocel 2315 or NP1 are the products we use) to replacing the flashing entirely if it’s corroded or improperly installed.
Valley Debris Accumulation
The valleys on a tile roof — the V-shaped channels where two roof slopes meet — are designed to funnel water off the roof quickly. In Tucson, they also catch leaves, pollen, pine needles, and the debris carried in by monsoon winds. When that debris builds up, it creates a dam.
Behind a debris dam in a valley, water slows down, backs up, and has time to find its way under the tiles at the valley edge. Felt underlayment in valley areas deteriorates faster because it stays wet longer. Eventually you get a valley leak that’s hard to diagnose because the point of entry is upstream from where the stain appears on the ceiling.
Clearing debris from valleys is a maintenance task, not a repair — but neglecting it long enough creates a repair situation. If you have large trees near your house and a tile roof, valley cleaning should be part of your annual routine.
Improper Tile Reset After Previous Work
Any time someone works on a tile roof — to access a vent, replace a pipe boot, or make a repair — tiles are removed and then reset. If they’re not reset correctly, you’ve created a new leak path that didn’t exist before.
Tile needs to be reset with proper overlap and alignment so water sheds correctly. Ridge and hip caps need to be properly mortared or fastened. If a previous roofer or HVAC technician moved tiles and didn’t put them back right, you may develop a leak in that area that has nothing to do with the original reason they were up there.
If you’ve had work done on or near your roof recently and then developed a new leak, this is worth investigating.
How to Track a Tile Roof Leak
One thing that makes tile roof leaks frustrating is that water rarely enters exactly where it shows up on the ceiling. Water moves along rafters, follows the deck, and drips at low points that may be several feet away from the entry point.
If you have attic access, checking the deck with a flashlight during or immediately after a rain is the most reliable way to find where water is entering. Look for wet wood, watermarks, or daylight visible through the deck.
If you don’t have attic access, a systematic inspection by a roofer — checking all penetrations, flashings, and the condition of the underlayment — is the most reliable way to find the source.
Spot Repair vs. Re-Underlayment: How to Decide
Once the leak source is identified, the next question is how to fix it. Not every tile roof leak means a full re-underlayment — but not every leak should be patched and forgotten either.
A spot repair makes sense when:
- The leak source is a single, clearly identified point — a failed pipe boot, a cracked section of flashing, one poorly reset tile after previous work
- The underlayment in the surrounding area is still in good condition (not brittle, not cracking, not shedding material)
- The roof is under 15–18 years old and this is the first leak
Re-underlayment makes more sense when:
- The roof is 20+ years old and the underlayment is approaching end of life
- Multiple leaks are appearing in different areas — a sign that the membrane is failing generally, not at one spot
- You’ve repaired the same area more than once without lasting results
- Lifted tiles during inspection reveal underlayment that’s dry, crumbling, or has visible cracks across a broad area
The honest way to think about it: a spot repair on a roof with deteriorating underlayment is borrowing time. You fix one spot and another opens up in six months. At some point the cumulative repair costs exceed what a re-underlayment would have cost — and you still don’t have a sound roof. If the underlayment is the problem, treat the underlayment.
What Tile Roof Leak Repairs Typically Cost in Tucson
Pricing varies based on roof size, access difficulty, and what’s actually causing the leak — but here’s a realistic range for the most common repairs:
Pipe boot replacement: $200–$450 per boot, depending on pipe size and accessibility. Most homes have 2–5 boots. If multiple boots are failing, replacing them all at once costs less per boot than separate service calls.
Flashing repair or reseal: $250–$700 for a typical wall or chimney flashing reseal. Full flashing replacement runs higher depending on the scope.
Spot underlayment repair (a defined section where tiles are removed, underlayment patched, tiles reset): $500–$1,200 depending on the area affected.
Full re-underlayment: This is a significant project. Expect $6–$8 per square foot installed, depending on roof complexity, pitch, and underlayment product. For a 2,000 square foot roof, that’s roughly $11,000–$19,000 — but you’re getting a roof that functions as new for another 20–30 years, without buying new tile.
Individual tile replacement: $75–$200 per tile for cracked or missing tiles, including labor and materials. Matching existing tile can affect cost if the original product is discontinued.
These are Tucson market ranges as of 2024. If you get an estimate significantly below these numbers, it’s worth asking what’s being skipped. If it’s significantly above, get a second opinion.
Tucson-Specific Factors That Accelerate Tile Roof Wear
Most roofing content is written for a national audience. Tucson’s conditions are different enough that it’s worth being specific.
Monsoon season is the stress test. Tucson receives the majority of its annual rainfall in July, August, and early September — often in intense 30–60 minute bursts. A tile roof that has minor vulnerabilities going into monsoon season will almost certainly reveal them during it. We consistently see a spike in leak calls in late July and August.
UV exposure here is extreme. Tucson receives over 300 days of sunshine per year with UV index readings that regularly hit 11+ in summer. That UV degrades rubber (pipe boots), sealant (flashings), and underlayment membrane faster than the manufacturer’s rated lifespan assumes. Products rated for 25 years in moderate climates may give you 15–18 in Southern Arizona.
Thermal cycling is severe. A tile roof in Tucson might go from 40°F at 5 AM to 160°F surface temperature at 2 PM in summer. That daily expansion and contraction works sealant joints loose, shifts tiles that aren’t properly fastened, and stresses mortar at ridge and hip caps over time.
Palo verde and mesquite debris. Many Tucson homes are landscaped with native desert trees, which are beautiful but shed fine debris — seed pods, pollen, small branches — that accumulates in roof valleys. This debris holds moisture against the valley underlayment long after it rains, accelerating wear in exactly the area most vulnerable to leaks.
Frequently Asked Questions
My tile roof is leaking but all the tiles look fine from the ground. Is that possible?
Yes — and it’s actually the most common scenario. The tile is designed to shed water, not to be the waterproof layer. The underlayment beneath the tile does the actual waterproofing work. When the underlayment fails from age or UV degradation, the tiles above it can look completely intact while water passes through freely. A proper inspection requires lifting tiles in suspect areas to check the membrane directly.
How do I know if my tile roof leak is covered by homeowner’s insurance?
Coverage depends on the cause. Sudden, accidental damage — a branch falling through the roof, a tile cracked by hail — is typically covered. Damage from normal wear, age, or lack of maintenance is generally excluded. Underlayment failure due to age almost never qualifies. If a storm was involved (a monsoon moved tiles or damaged flashing), it’s worth filing a claim and getting a professional damage assessment to document it. We can provide written inspection reports for insurance purposes.
Can I find and fix a tile roof leak myself?
Finding it: possibly, if you have attic access and can check the deck during or right after rain. Fixing it: it depends. Clearing valley debris, recaulking a small flashing gap with a compatible sealant, or resetting a single loose tile are within reach for a careful DIYer. Anything involving the underlayment, replacing flashing, or walking extensively on the roof to find a problem is better left to a professional. Walking on tile incorrectly creates new damage — you need to know where to step.
How long does a tile roof repair take?
A pipe boot replacement or flashing reseal is typically a same-day job, often completed in 2–4 hours. A spot underlayment repair where tiles need to be removed, membrane patched, and tiles reset might take a full day. A full re-underlayment on a typical residential roof is a multi-day project — plan for 3–5 days depending on roof size, complexity, and crew size.
We just had our HVAC replaced and now our roof is leaking near the unit. Is that related?
Very likely yes. HVAC installations require access through or near the roof for refrigerant lines, electrical conduit, and sometimes new curb penetrations. If tiles were moved and not reset correctly, or if the curb flashing was disturbed, a new leak path can open up. This is the contractor’s responsibility to fix — reach out to whoever did the HVAC work first. If they’re unresponsive, a roofer can document what happened and correct it.
What’s the difference between a tile roof repair and a tile roof replacement?
A repair addresses a specific failure point — a boot, a flashing, a section of underlayment — while leaving the rest of the roof intact. A replacement (or re-underlayment) removes all the tile, replaces the waterproofing layer underneath, and resets or replaces the tile. In most cases the tile itself doesn’t need to be replaced — clay and concrete tile is extremely durable and can often be reused. What drives a full re-roof decision is the condition of the underlayment, not the tile.
DC Roofing of Arizona specializes in tile roof repair and leak diagnosis across Tucson. If you’re dealing with a tile roof leak and can’t find the source, we’re happy to take a look — give us a call for a free inspection.